| Series |
|---|
Incorporating A New Ingredient
If you’ve been following this series from the beginning, congratulations on sticking with it — we’ve come a long way since building our first working DCTL. This is also a good moment to assess how well you understand everything we’ve done up until this point, and to revisit anything you feel rusty on or might have missed. We’re now in the home stretch of this series, and of creating our Filmic Contrast tool. As we have throughout the series, let’s review my written summary of the tool’s functionality:
This tool, called Filmic Contrast, will apply a user-specified amount of contrast uniformly to the R, G, and B channels, followed by a user-specified mixture and intensity of cool colors to the shadows and warm colors to the highlights.
We’ve successfully completed the first of the two steps listed in this summary (application of uniform contrast), and as a bonus, we’ve even explored implementing different kinds of contrast. But now it’s time to tackle that second step: adding a user-specified mixture of cool colors into the shadows and warm colors into the highlights. This is commonly known as split-toning, and I’ve discussed its aesthetic merits extensively in another Insight. Today, our focus will be on how we can best implement this technique within our tool while affording control over its details to the user. We’ll be conceptualizing and adding this component into a new GitHub branch of our existing Filmic Contrast.dcl.
In today’s Insight we’ll cover:
- Conceptualizing intuitive UI parameters
- Translating an aesthetic or creative idea into a mathematical recipe
- Thinking “upside-down” for shadow and lift operations
Let’s dive in!
Conceptualizing Our New Module
Thus far, we’ve been treating our red, green, and blue channels uniformly. Even though we understand these channels are independent of one another, we’ve chosen to apply the exact same manipulation to teach. Today we’re shaking that up with the addition of split-toning, which by definition involves applying differing adjustments to each channel. Our first task is to clearly understand what we’re seeking to do to our image — in other words, what exactly split-toning is in terms of how it affects an image. I’m describing split-toning as two simultaneous operations:
- The raising of an image’s blue and/or green channels, and/or the lowering of its red channel in the lower end of the image.
- The raising of an image’s red and/or green channels, and/or the lowering of its blue channel in the upper end of the image.
Planning Things Out
This split-tone module is complex enough that it’s a good idea to write out a “sub-summary” describing its functionality. But before we do that, we should decide what mathematical operation(s) we want to use to get the raising and lowering behaviors referenced in our description above. I’m proposing that we use gain and lift — they’re simple, broad adjustments we can easily implement and which are unlikely to cause artifacts.
With these operations in mind, here’s a summary of what we need to do:
This component, which will be a function within the Filmic Contrast tool, will apply split-toning in two stages –
- Applying gain to all pixels in the red and green channels. The respective amount of gain applied to these channels will be determined by user input, and the blue channel will remain untouched.
- Applying lift to all pixels in the red and blue channels. The respective amount of lift applied to these channels will be determined by user input, and the red channel will remain untouched.
Setting Up UI Parameters
Next, let’s think about the user interface and controls we’re creating. As always, designing a good UI is a combination of offering both enough control and enough constraint. The user should have sufficient latitude to achieve their vision, but there should be sensible constraints that keep them within the realm of useful, pleasing adjustments. We’re providing them with three sliders for controlling their split-toning:
- Split-tone strength. This slider will control the overall intensity of the effect.
- Shadow hue. This 0-1 slider will allow the user to dial in the hue of their cool shadow push, with an effective range running from blue to green.
- Highlight hue. This 0-1 slider will allow the user to dial in the hue of their warm highlight push, with an effective range running from red to green.
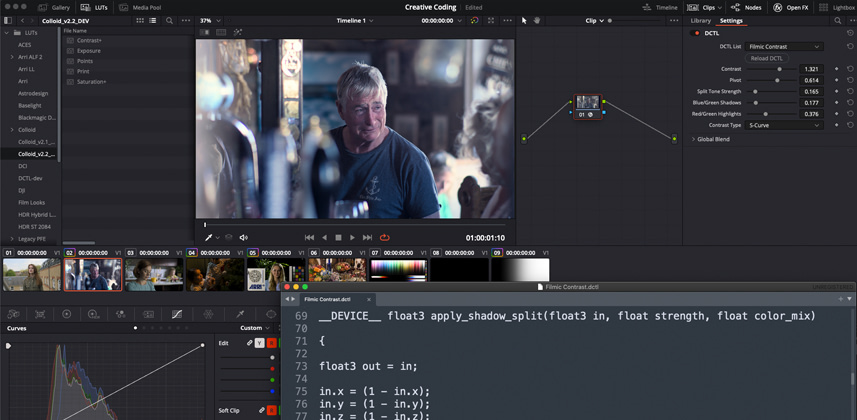
After saving a new branch of our Filmic Contrast DCTL, we’ll add these UI parameters beneath our existing UI parameters:
DEFINE_UI_PARAMS(split_strength, Split Tone Strength, DCTLUI_SLIDER_FLOAT, 0.0, 0.0, 1.0, 0.1)

DEFINE_UI_PARAMS(split_shadow_color_mix, Blue/Green Shadows, DCTLUI_SLIDER_FLOAT, 0.5, 0.0, 1.0, 0.1)

DEFINE_UI_PARAMS(split_highlight_color_mix, Red/Green Highlights, DCTLUI_SLIDER_FLOAT, 0.5, 0.0, 1.0, 0.1)
Creating Our New Function
We’re going to build out two additional functions which will apply the split-toning:
- apply_highlight_split – This will operate on the red and green channels while leaving the blue alone
- apply_shadow_split – This will operate on the blue and green channels while leaving red alone. In addition, this function will temporarily invert the image so that we can apply all our lift operations as gain operations, just as we did in the piecewise power function we used for contrast.
Defining the apply_highlight_split function
__DEVICE__ float3 apply_highlight_split(float3 in, float strength, float pivot, float color_mix)

{
We’re setting up the function to read in our RGB input value (in), the split-tone strength read in from UI (strength), the pivot value read in from UI (pivot), and the split_shadow_color_mix read in from UI. (Remember from our last Insight that we can read variables into our function with any name we choose, and they needn’t match the name of the variable we’ll pass when we call the function from within our main “transform” function.
Next are the two key lines within this function — these determine the respective gain factors we’ll be multiplying the red and green channels by in order to produce the color push specified by the user.
float red_strength = ((1 - color_mix) * strength) + 1.f;

float green_strength = (color_mix * strength) + 1.f;
So what are we doing in these two lines? With the first line, we’re calculating how much red gain should be applied, which is determined by:
- The value of the split_highlight_color_mix slider. By subtracting its value from 1, we’re effectively stipulating that the further from zero/toward one the slider is moved, the less red will be added.
- The value of the split_strength slider. The higher its value, the greater the overall gain factor becomes.
What about the addition of 1 at the end of both lines? Remember that since we’re going to be using these numbers to apply a gain (multiplication) operation, our default value should be 1, not zero (any number multiplied by 1 equals itself, meaning no change will occur).
From here, all we have to do is apply red_strength and green_strength as gain factors and return a value (remember, we’re not changing the blue channel):
out.x = in.x * red_strength;

out.y = in.y * green_strength;

return out;

}
Defining the apply_shadow_split function
This function works in the same way, except we derive blue_strength and green_strength and apply them to the respective blue and green channels. We also bookend inversion operations on either side, as we did with our piecewise power function for contrast. This turns our image upside down (black becomes white), and allows us to apply lift operations with simple multiplication like we do with gain.
__DEVICE__ float3 apply_shadow_split(float3 in, float strength, float pivot, float color_mix)

{

float3 out = in;
in.x = (1 – in.x);
in.y = (1 – in.y);
in.z = (1 – in.z);
float green_strength = (color_mix * strength) + 1;
float blue_strength = ((1 – color_mix) * strength) + 1.f;
out.x = in.x;
out.y = in.y / green_strength;
out.z = in.z / blue_strength;
out.x = (1 – out.x);
out.y = (1 – out.y);
out.z = (1 – out.z);
return out;
}
If you’re not following everything perfectly, don’t worry! This post will always be here for your reference, and I’m going over all this again in today’s video.
Now that we’ve built our apply_highlight_split and apply_shadow_split functions, we just need to call them from within our main transform, which we’ do, following the application of our contrast adjustment. Let’s put it all together in today’s video!
Final Thoughts
Here’s my GitFront link with updated code from today’s changes.
Now that we’ve got this split-toning component on its feet, it’s time to revisit the subject touched on today of providing helpful constraints to the user.
Right now, our sliders for red/green in the highlights and blue/green in the shadows are covering too broad a hue range, and really only produce nice-looking results in the middle third or so of the slider. So in our next Insight, we’re going to look at refining these parameters so that we’re getting good results at both ends of the sliders as well as everywhere in between. We’re also going to tweak our newly added components to ensure that overall luminance is being preserved as we add our warm highlight and cool shadow pushes.
In the meanwhile, take another lap through today’s Insight and try to really get fluent in all these new ideas. And if you have questions, ask them in the comments!
-Cullen
-
Live Call – Coding DCTLs Wrap Up Discussion with Cullen Kelly
-
Creative Coding with DCTL Part 9 – Adding A Curve Visual Overlay
-
Creative Coding with DCTL Part 8 – Refining UI Parameters
-
Creative Coding with DCTL Part 7 – Adding Split Toning
-
Creative Coding With DCTL: Part 6
-
Creative Coding With DCTL: Part 5
-
Creative Coding with DCTL: Part 4
-
Creative Coding With DCTL: Part 3
View All