What are Premiere’s different project types? How do you prep for a Premiere Pro color correction session?
The notion of ‘Team’ sharing in post-production software has been chased since the early 2000’s with Final Cut Studio. Every vendor has tackled this dream – and mostly failed. Blackmagic is finally circling in on a robust ‘Team’ solution with DaVinci Resolve Studio. Adobe is joining the party by ramping up Premiere Pro CC with their own solution to the sharing dream. In this Insight article you learn:
- What are the different types of Premiere Pro projects?
- How do you choose which project type is best for you while collaborating with a colorist (color correcting entirely in Premiere)?
- What can an editor do to properly prepare a sequence for a colorist who is sharing your Premiere project?
Premier Pro CC now has three different project types, each with different levels of sharing capabilities.
Team projects and Shared projects both allow multiple workstations to open the project file. The traditional Premiere Pro project is not designed to be shared (and can be corrupted if multiple users try to work within it simultaneously). But you can migrate between these project types as needed – and ‘upgrade’ to a Shared or Team project only when it’s time to bring in a colorist or collaborator.
But how do you choose the project type for upgrading your sharing-adverse Premiere project?
Try asking yourself this series of questions:
- Is the editor & colorist within a singe large company or organization with an Adobe Enterprise license?
- Does the budget allow each team member to acquire a Team license for temporary use?
- Is the entire team in-house using a shared server for all their media and assets?
- Is an outside vendor contracting to do a specific job, like color correction?
Once you understand the differences and requirements of the different project types, your answers will clearly guide you to your best decision.
Defining and understanding Premiere Pro project types
Adobe’s Hollywood group designed Team and Shared project workflows from their experiences with broadcast and movie productions. (Yes, Adobe does have a “Hollywood” group, headed by David Helmly and Karl Soule.) The terms ‘Team’ and ‘Shared’ confuse the vast majority of Premiere users. What … and which … means … what? Karl explains the difference between Team and Shared projects in this blog post. It’s informative and fairly short. In this Insight, we are digging much deeper and I’m sharing my personal experiences, observations, and opinions.
- Team projects: Cloud-based, require a Teams or Enterprise Adobe license and work better for short-form projects. Up through half-hour episodic TV shows.
- Shared projects: Located on local servers, work with any kind of Creative Cloud license from single through Enterprise, and can deal with huge amounts of assets (think up to and including a long feature-length film like DeadPool 2).
- Standard projects: These are local and may be saved on either a single computer or a network server, and do not have any protection or process for multiple users accessing them simultaneously.
Understanding Team Projects
Team projects are only available with special licensing. But you can create a temporary Team projects by paying a bit extra to Adobe for Teams or Enterprise licenses for as short a time as a single month. Each workstation must have that license to access the Shared project. Check this Adobe business page for general details and this page for Adobe Teams and Enterprise license pricing. And note: The cost is a replacement to whatever you’re now paying for licensing, not in addition. You can return to your regularly scheduled Adobe license after the Enterprise license expires.
You do need very good internet connections and adequate available storage in all locations.
The Team project is a good choice if you need to do online sharing of work back and forth. For example, I’m currently working on a project with an editor from Capetown, South Africa. He’s doing editing/audio/fx. I’m doing color. We might split the graphics. We have both temporarily upgraded our licenses for this project’s time-span. To get started in this workflow:
- The person starting the project adds media to the project via the Media Browser as they would normally.
- Everyone else links to the media via the Edit > Team Projects > Media Management dialog after they’ve placed the media on either a local drive or their network server.
- Note: Everyone on the project needs the media folders locally on their computer or local network storage.
From this point forward, all the “meta” information of the project, including sequences, lives on your local system AND on Adobe’s ‘cloud’ servers.
What happens as we’re working simultaneously? I do my grading and graphics work on my system and my ‘Premiere Pro Team Project’ pushes my Share Changes command to the Cloud server as an updated version. Within moments my remote editor is notified and has those changes available in South Africa! We can both navigate through previous versions of the project (more details in a moment). It’s pretty slick after you get a bit of practice with it.
When we started, my editor suggested we could create a production team together and I thought … naw, we’re too far apart. A week later I’m thinking the production team idea is something to seriously consider. It is an easy process. And Team Projects are well suited for adding a temporary person to a project. Like . . . a colorist.
The big key to working with a Team Project
A BIG caveat to Team projects… remember, the first person adding media to the project must use the standard “Media Browser” panel to add the media. BUT everybody else must use the Team Project Media Management dialog to locate the media on their machine and link to it. What happens if you get this wrong, like me when I used the normal method for linking to my source footage on my local drive???
I immediately got a call from South Africa (thanks to WhatsApp), “What the ??? did you do? I was working then my Premiere tells me all the media is offline?” We figured it out. I relinked using the Team Project Media Management tool – but it took a bit of time. Save yourself the stress … follow the rules!
Versioning is one of the Team project’s hidden killer features.
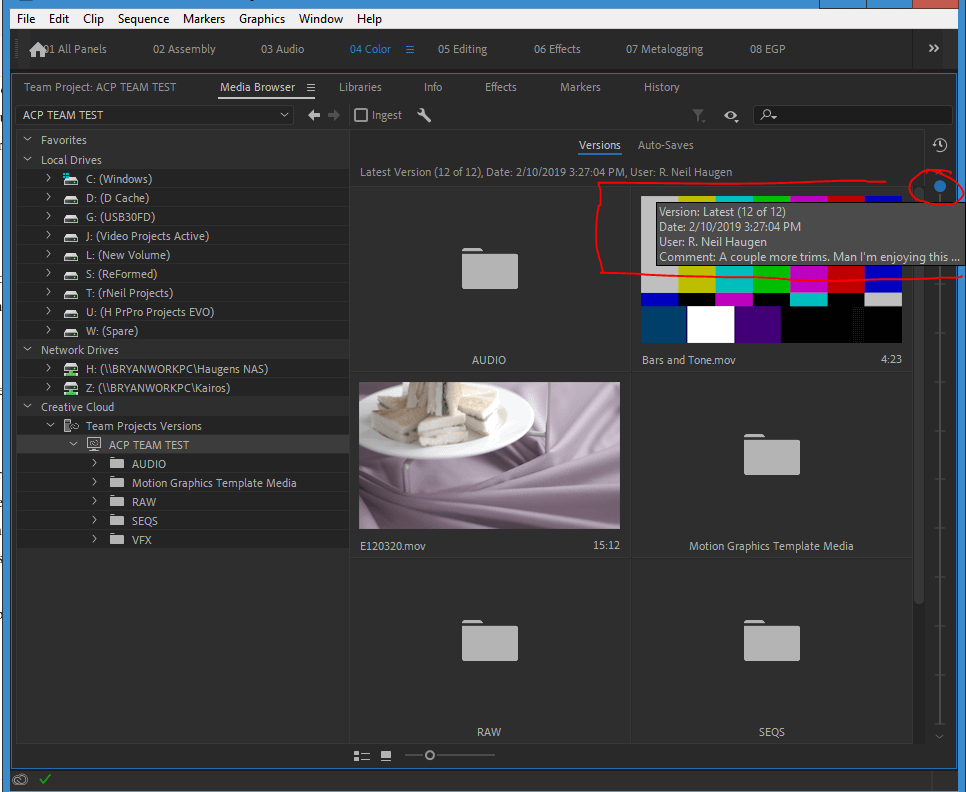
In the image below I’ve circled a blue dot in the Versions panel. You can click and drag to slide the dot down the gray line to scan through previous versions. Anytime you hover the cursor over the dot, the comment added to that version appears. It is easy to track who did what changes when. Version tracking is very easy to see. It makes going back to a previous version quick and easy. I’m liking this Versioning feature, a lot.
Converting a “standard” project to Team Project (and sending Invitations)
It’s easy to change a “standard” project to a Team project and add someone, like say, the colorist. First, the editor and the colorist both upgrade to a Teams license from Adobe. In the Premiere project, the editor:
- Goes to the menu system selecting Edit > Team Projects > Convert to Team Project.
- In the Project panel, the editor clicks the + icon that has appeared in the upper right corner to “invite” a new member to the team. They type the colorist’s Adobe ID email in the proper box and send it.
The colorist is now part of the team. All the project metadata is shared via the Adobe CC servers. On the colorist’s side (who is being invited into the Shared Project):
- The colorist accepts the invitation.
- They import the project using Premiere Pro’s Media Browser, scrolling down the left-side to the Creative Cloud options. But they do NOT locate or link to the media from the Media Browser panel.
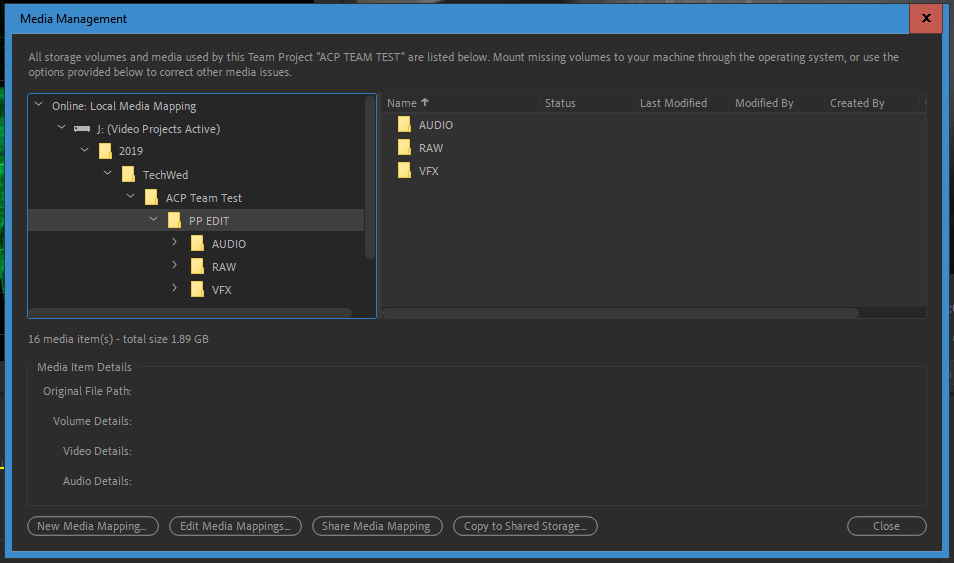
- They go to the Menu: Edit > Team Projects > Media Management.
- Twirling-down the carrot the colorist navigates to the media/assets on their local computer. “Online” are the assets you are currently linked to. “Local” means drives on you computer. “Network” means drives on your local area network.
What are my initial thoughts on Premiere Pro’s Team Projects?
Let’s just say, I’m suggesting the use of Team Projects for clients for most projects moving forward. So far, I really like this process. And the Versioning feature is both unexpected and killer.
Understanding Shared Projects
Shared Projects are simple to create, and available with any Adobe license type but are very different than Team projects. This is an in-house workflow. Premiere’s Shared projects require that assets are stored a common server that is attached to each workstation. And setting up to work with shared projects is fast and easy:
- Every user sets their Premiere Preferences > Collaboration > Project Locking dialog to on by clicking in it.
- They each enter a User or Work Station name in the User Name box so they can be identified both by Premiere and by anyone working on the shared project.
- In Preferences > Media, check-mark “Automatically Hide Dependent Clips”. (This cuts down on duplicated clips.) That’s … it.
Here’s where Team and Shared projects type seriously diverge…
Premiere’s Shared projects use a project locking framework. In other words, only one workstation has read/write capabilities on the Shared project. Everyone else can open the Shared project – but as Read-Only. How do you get an editor and a colorist working at the same time in the same project?
The most common and intuitive workflow:
- The lead editor locks the project and creates a new Shared project inside that project.
- The editor then duplicates and renames the locked picture sequence.
- The duplicated sequence is prepped for color correction (as described below).
- The prepped sequence is added to the Shared project.
- The colorist loads that Shared project and starts color correcting.
In this workflow, the colorist is working in a Shared project. Once they access that project, the Shared project is locked to them. And since lead editor locked the master project, it prevents any changes by the colorist (outside of the colorist’s Shared project). Yes, this gets very Inception-like. But it works.
Who should be using Shared projects?
Shops with multiple people “touching” projects should use Shared projects by default. It’s simply safer. If you’re in this situation and you’re not using Shared projects today, you need to have a company-wide discussion about switching over. And if you’ve ever had a project get corrupted from multiple people trying to open a project simultaneously, make the switch ASAP.
Understanding Standard Projects
Premiere’s ‘Standard’ project is the type of project file we’ve been using since, forever. It is not sharing-tolerant.
The standard project workflow for a colorist is similar to a typical grading process with outside clients. The client sends the project file and media to the colorist. The assets are copied onto their system. The Premiere project is loaded and assets get linked. If you’re color correcting in Premiere then you’re ready to go, skipping the rest of the conform process in a typical Premiere > Resolve workflow. But the editor should still prep the colorist’s timeline, as described below.
Get to Work, ASAP!
In this scenario there is no need to check time-ramps, re-sizing, or any of those problems in an XML/EDL conform process. Everything is staying native to Premiere. That’s the big reason some clients prefer their color correction to happen inside of Premiere. But that Premiere project still needs to get out of the editor’s system and onto the colorists.
This type of project is ideal for the solo user who has no desire or needs for simultaneous sharing.
Project Type Recommendations:
If you’re in an in-house situation, say the editor is down the hall and you’ve got a decent server, definitely the Shared Project file-type is the way to go. 100%.
If you’re in separate locations, then … go for the Team Project using a temporary Team Project license for each person accessing the Project. And the pricing difference to get a Team license is affordable.
If you can’t do the first two options, the old style still works. Remember, if you need to – an existing project can be changed to a Shared or Team project at any time.
Editors Guide For Color Correction Prep
No matter the type of Premiere Pro project you’re using, the editor does their Producer a great service by properly prepping their timeline for color correction! This guide assumes you’re keeping the entire color correction process within Premiere. It’s a shortlist of prep steps. But they need to be done to keep the colorist from going insane or making mistakes.
Simplify The Timeline/Sequence!
The first step in prepping a project for color correction is to simplify the timeline. It is very similar to prepping a timeline for final exporting in an XML/EDL workflow. If possible, a “flattened” sequence of a single track/layer of main media should be created. At the least, the media clips should be on no more than two to four tracks, or it becomes a mess for the colorist. Lift up all titles/graphics and other assets that won’t be graded a few tracks up to leave two or more empty tracks in case the colorist needs to use adjustment layers. This is a simple enough process for the editor or their assistant, and much less error-prone than letting the colorist (who knows nothing about your workflow) do this on their own.
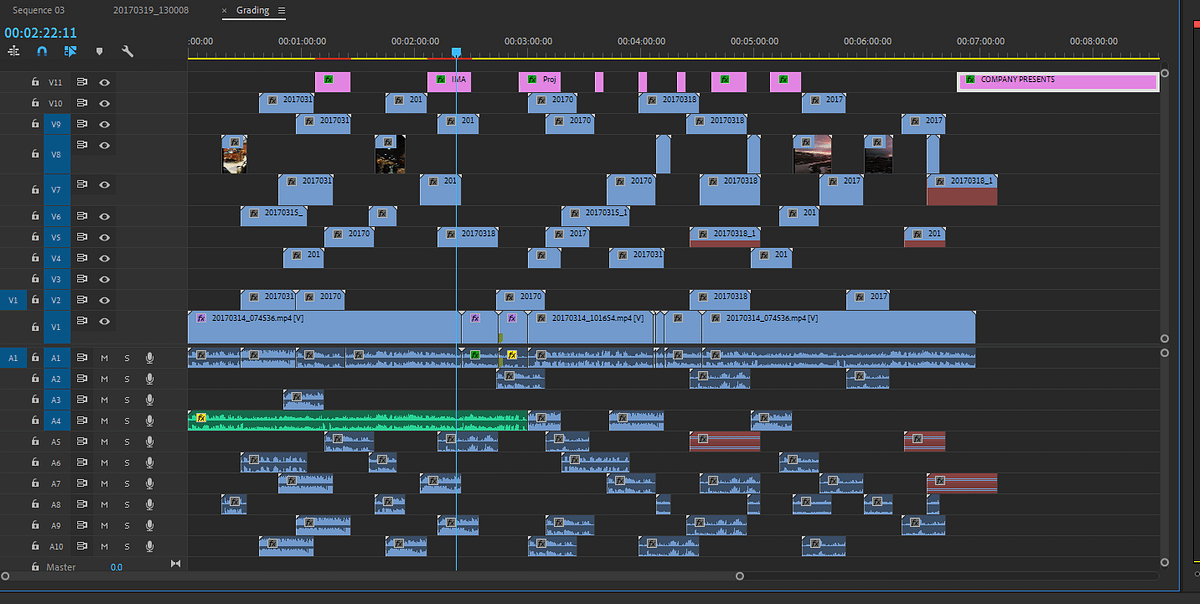
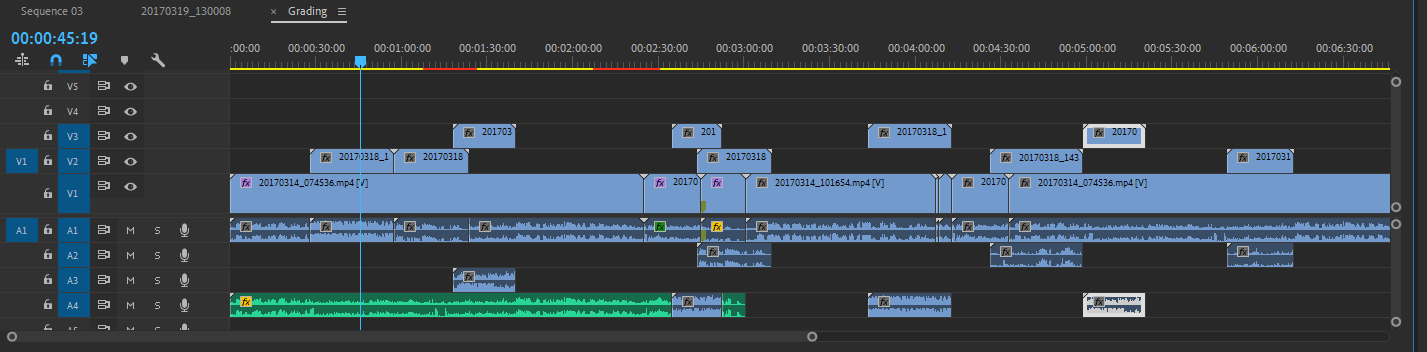
We’ve all seen something like the following sequence … and grading this mess is absurd. Clearly many of those clips are being covered over and never seen on-screen … but how is the colorist supposed to know which ones are seen (or not)? Or if there are composite modes active? Why do you want the colorist to spend any time sorting out what clips to actually color correct? It is much faster, simpler, and less expensive for an editor to simply clean up their own sequence.
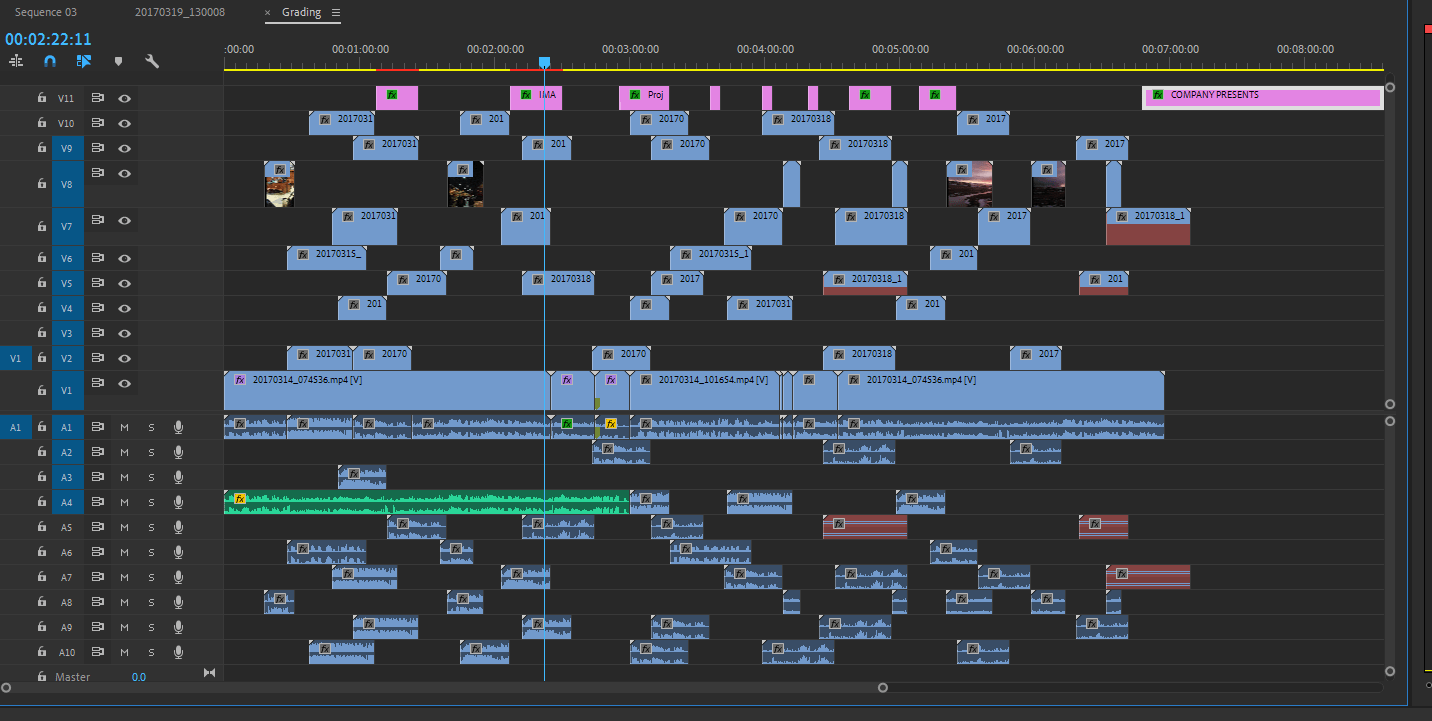
The ideal is a single track of media clips (with all graphics removed). But depending on transitions, two to three tracks is often required. The end result should be a timeline that looks like the following:
A colorist can work from the above-simplified timeline without too much trouble, and spend almost no effort deconstructing which clips need color correction and which clips should be ignored (because they are covered over). As a colorist, if your client refuses to simplify the timeline for you, then quote them the additional cost for you to do this work on their behalf. Someone needs to simplify the sequence. If not the editor, then the colorist.
Separate the sequence to be graded from the rest of the project!
Looking through a project’s bins for the sequence to grade is a train-wreck coming down the track. The solution is simple. The client should make a separate project. Or at least create a clearly marked bin within Premiere for the sequence to be graded. In Team projects, a sub-project is great. For Shared projects, a sub-project is also great. And at that point, it’s ready for the colorist to start working.
BUT … if this is a standard, individual project … there are two more steps! That’s why I recommend Team or Shared projects when you can.
Delivery: Use the Project Manager to Collect and Copy Media to the Grading Project Folder!
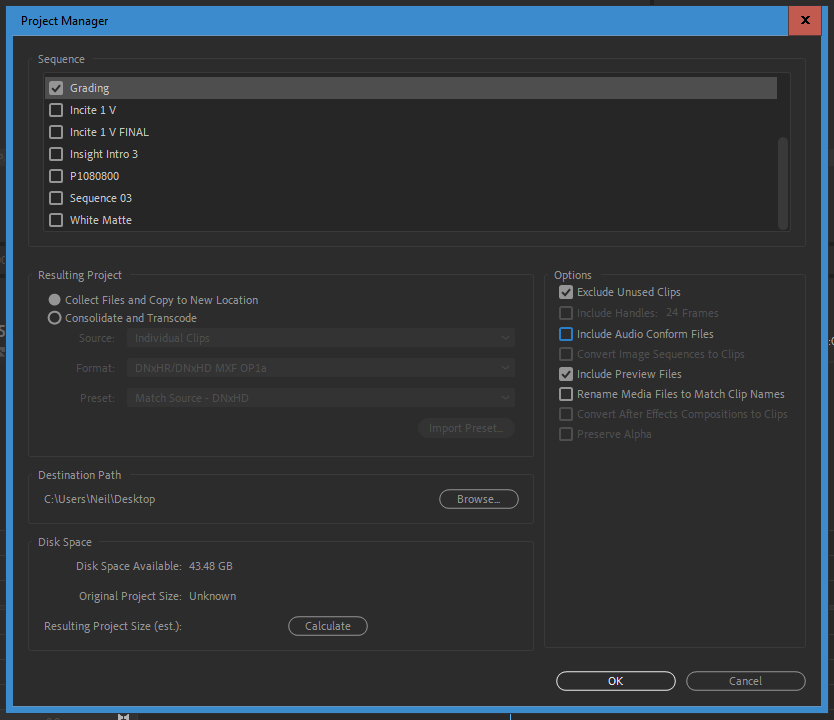
In Team or Shared projects, this isn’t necessary. For standard projects, Premiere has a Project Manager that copies all or part of a project into a new project file. Here are my recommendations on options in the Project Manager:
- Exclude Unused Clips: Check
- Include audio conform files: Uncheck. (Exception: I advise mixing down your audio to a single stereo track and in the color correction timeline, delete all the audio and replace it with this Stereo track. If you do that, then you can ‘Check’ this option.)
- Include Preview Files: Take your pick, yes or no. But on a big job, you may want to choose no to cut down on the total file size.
- Collect and Copy: Check. This is a good choice that keeps all existing names and media in place.
Test The Project, Ensure All Clips Used Are Included!
The collected and copied media and Premiere Pro project need testing. The editor must close the ALL projects and then load the grading project on their computer. They then scrub down the timeline seeing that all clips are in their proper place, and all media is connected. This is the time to find out that Premiere missed a few clips. And also, to make sure that resizing and time-ramps have been applied within the exported project.
After the editor or their assistant has checked the exported file, they should deliver it to the colorist. And … let the grading begin!
-Neil