| Series |
|---|
Day 15: 25 Insights in 25 Days 2019 New Year Marathon!
Part 1: Removing an object using the Paint Tool’s Clone Brush
It’s very common for clients to ask for an object or a shadow to be removed from a shot, be that a boom mic or an item which shouldn’t be there for some reason. This is where diving into the Fusion Page is absolutely perfect because you can often do the fix quite quickly and it can be easier and more efficient than exporting/re-importing the shot to to be worked somewhere else.
For the example I’ve chosen, I’m going to remove an item that requires several steps;
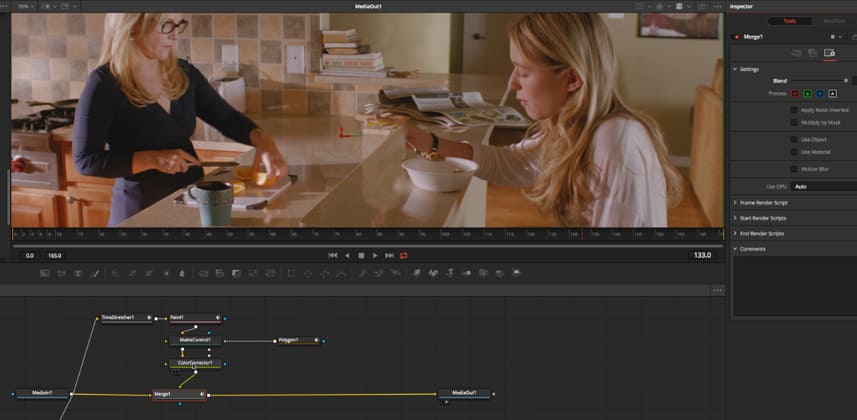
- Create a clean plate and remove the item using the Paint Tool’s Clone Brush. I show a couple of different modes for the clone brush.
- Mask out the area to be replaced.
- Track the replacement onto the shot.
- Add foreground elements back in (a hand in this case) with careful masking and keying.
Clone Brush
The important thing to be aware of when using a vector paint tool is that you need to set up the controls for how the brush will behave when you start to paint and most of these controls don’t affect paint strokes you’ve already made – those controls are in the Modifiers tab. However, if you set everything up correctly in the Brush, Apply and Stroke Controls first, then your paint strokes won’t need adjusting in the Modifiers tab.
By default, the Clone brush will clone an area from its input and it will be a moving image, which may or may not be what you need. I show how you can take any input from the Flow – it could be from any tool in the Flow – and we see a potential drawback with this method, as each brushstroke always clones in from the original source. I then show the way I’ve been doing this kind of job which is to feed the Paint tool with a freeze-frame from a Time Stretcher. (In this case, the frame needed was frame 0 so I could leave it with the default value.)
Note – Using a freeze frame often means adding a Film Grain tool into the Flow, in this case it would be just after the Paint tool.
Using the Clone brush in Fusion is quite similar to the Clone tool in PhotoShop. Option (Alt) + click will select an area to clone from.
Different ways to get the same result
What I really like about Fusion is that it lets you work in a way that makes sense to you, as you experiment and learn – it can be very creative. There are usually several different ways to achieve the same thing and, if you ever change your mind, it’s usually easy to change, edit and tweak what you’ve done. Most of the time I don’t think it really matters which way you do something, just so long as it works (and it isn’t ridiculously wasteful on processing).
In this Insight, I used a Merge tool which I later wanted to connect to a Tracker but it might have been neater to actually use the Tracker to do the Merge itself since it has a foreground input and has a Match Move function.
In Part 2 of this Insight, we’ll look at some masking and keying options to help us add the foreground back on top.
Member Content
Sorry... the rest of this content is for members only. You'll need to login or Join Now to continue (we hope you do!).
Need more information about our memberships? Click to learn more.
Membership optionsMember Login
-
Beyond Crypto-Kitties – Blockchain technology in post production
-
Breaking Down A Black and White Film with a Violet Twist
-
Behind The Curtain – 16mm Style Grade Part Four
-
What Is A CDL And When Do You Use It?
-
Revisiting Using A Single Large Format Monitor
-
Rotoscoping to Replace a Foreground Element in Resolve Fusion
-
From Commercial Colorist to Dailies – How Does the Job Change?
-
Get Out There! – Updating Your 2019 Showreel
View All